官方文档只在ubuntu上测试过,centos,rocky,redhat其实都可以安装,只是需要安装的依赖可能略有不同
一、环境准备
系统rocky9.2,数据库mysql8.0.32,python3
关闭防火墙和selinux,然后重启
创建安装目录
[root@seafile ~]# mkdir /opt/seafile
下载安装文件
[root@seafile ~]# wget https://seafile-downloads.oss-cn-shanghai.aliyuncs.com/seafile-server_10.0.1_x86-64.tar.gz
复制安装文件到安装目录并解压
[root@seafile ~]# mv seafile-server_10.0.1_x86-64.tar.gz /opt/seafile/
[root@seafile ~]# cd /opt/seafile/
[root@seafile seafile]# tar -zxf seafile-server_10.0.1_x86-64.tar.gz
创建installed目录用来存放seafile安装文件
[root@seafile seafile]# mkdir installed
[root@seafile seafile]# mv seafile-server_10.0.1_x86-64.tar.gz installed/
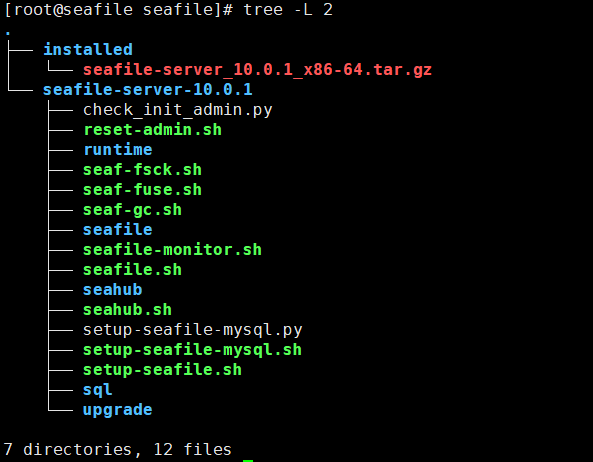
目录结构如下图所示
开始安装依赖
[root@seafile seafile]# dnf -y install python3 python3-setuptools python3-pip memcached python-devel
[root@seafile seafile]# dnf --enablerepo=crb install mysql-devel -y
[root@seafile seafile]# yum -y install gcc
[root@seafile seafile]# pip3 install --timeout=3600 wheel django==3.2.* future==0.18.* mysqlclient==2.1.* pymysql pillow==9.3.* pylibmc captcha==0.4 markupsafe==2.0.1 jinja2 sqlalchemy==1.4.3 psd-tools django-pylibmc django_simple_captcha==0.5.* djangosaml2==1.5.* pysaml2==7.2.* pycryptodome==3.16.* cffi==1.15.1 lxml
安装mysql
[root@seafile seafile-server-10.0.1]# yum -y install mysql-server
在mysql中创建seafile用户设置密码,我用官方脚本出错了,所以手动来设置
mysql> alter user root@localhost identified by '你的密码';
Query OK, 0 rows affected (0.00 sec)
mysql>
mysql> create user seafile@localhost identified by '你的密码';
Query OK, 0 rows affected (0.01 sec)
mysql> grant all privileges on *.* to seafile@localhost; 给seafile用户赋权
二、开始安装
运行安装脚本
[root@seafile seafile-server-10.0.1]# ./setup-seafile-mysql.sh
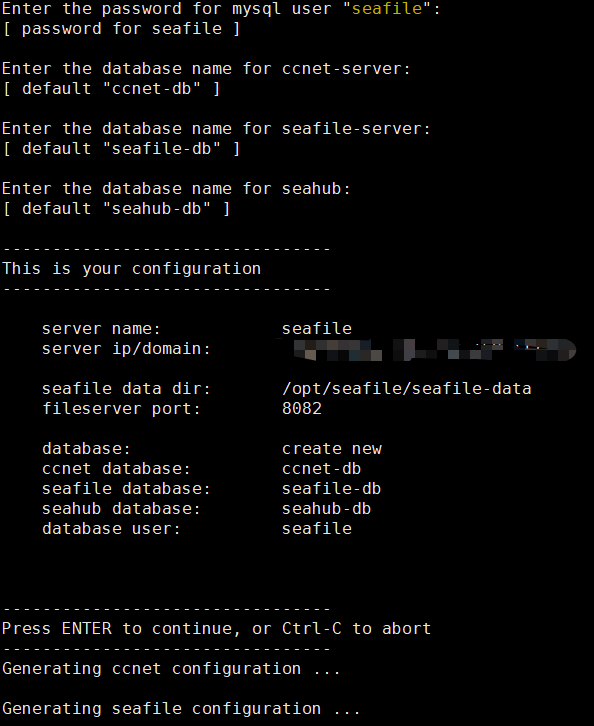
然后会询问你一些问题用来安装seafile
安装完成如图所示
三、配置nginx反向代理
[root@seafile seafile-server-10.0.1]# yum -y install nginx&&systemctl enable --now nginx
[root@seafile seafile-server-10.0.1]# vim /etc/nginx/conf.d/seafile.conf
server {
listen 80;
server_name seafile.example.com; 修改你的域名
proxy_set_header X-Forwarded-For $remote_addr;
location / {
proxy_pass http://127.0.0.1:8000;
proxy_set_header Host $host;
proxy_set_header X-Real-IP $remote_addr;
proxy_set_header X-Forwarded-For $proxy_add_x_forwarded_for;
proxy_set_header X-Forwarded-Host $server_name;
proxy_read_timeout 1200s;
# used for view/edit office file via Office Online Server
client_max_body_size 0;
access_log /var/log/nginx/seahub.access.log;
error_log /var/log/nginx/seahub.error.log;
}
# If you are using [FastCGI](http://en.wikipedia.org/wiki/FastCGI),
# which is not recommended, you should use the following config for location `/`.
#
# location / {
# fastcgi_pass 127.0.0.1:8000;
# fastcgi_param SCRIPT_FILENAME $document_root$fastcgi_script_name;
# fastcgi_param PATH_INFO $fastcgi_script_name;
#
# fastcgi_param SERVER_PROTOCOL $server_protocol;
# fastcgi_param QUERY_STRING $query_string;
# fastcgi_param REQUEST_METHOD $request_method;
# fastcgi_param CONTENT_TYPE $content_type;
# fastcgi_param CONTENT_LENGTH $content_length;
# fastcgi_param SERVER_ADDR $server_addr;
# fastcgi_param SERVER_PORT $server_port;
# fastcgi_param SERVER_NAME $server_name;
# fastcgi_param REMOTE_ADDR $remote_addr;
# fastcgi_read_timeout 36000;
#
# client_max_body_size 0;
#
# access_log /var/log/nginx/seahub.access.log;
# error_log /var/log/nginx/seahub.error.log;
# }
location /seafhttp {
rewrite ^/seafhttp(.*)$ $1 break;
proxy_pass http://127.0.0.1:8082;
client_max_body_size 0;
proxy_set_header X-Forwarded-For $proxy_add_x_forwarded_for;
proxy_connect_timeout 36000s;
proxy_read_timeout 36000s;
proxy_send_timeout 36000s;
send_timeout 36000s;
proxy_request_buffering off;
}
location /media {
root /opt/seafile/seafile-server-latest/seahub;
}
}
然后启动seafile和seahub就可以了
./seafile.sh start
./seahub.sh start
四、设置开机自启
seafile开机自启
[root@seafile seafile-server-latest]# vim /etc/systemd/system/seafile.service
[Unit]
Description=Seafile
# add mysql.service or postgresql.service depending on your database to the line below
After=network.target
[Service]
Type=oneshot
ExecStart=/opt/seafile/seafile-server-latest/seafile.sh start
ExecStop=/opt/seafile/seafile-server-latest/seafile.sh stop
RemainAfterExit=yes
User=seafile
Group=seafile
[Install]
WantedBy=multi-user.target
设置seahub开机自启
[root@seafile ~]# vim /etc/systemd/system/seahub.service
[Unit]
Description=Seafile hub
After=network.target seafile.service
[Service]
# change start to start-fastcgi if you want to run fastcgi
ExecStart=/opt/seafile/seafile-server-latest/seahub.sh start
ExecStop=/opt/seafile/seafile-server-latest/seahub.sh stop
User=root
Group=root
Type=oneshot
RemainAfterExit=yes
[Install]
WantedBy=multi-user.target


发表评论