部署 Seafile 服务器(使用 MySQL/MariaDB)
本文档用来说明通过预编译好的安装包来安装并运行基于 MySQL/MariaDB 的 Seafile 服务器。(MariaDB 是 MySQL 的分支)
提示:如果您是初次部署 Seafile 服务,我们建议您使用自动安装脚本来快速部署一个 Seafile 服务。
下载
到下载页面下载最新的服务器安装包.
部署和目录设计
假设你已经下载 seafile-server_* 到/opt/seafile目录下。 我们建议这样的目录结构:
mkdir /opt/seafilemv seafile-server_* /opt/seafilecd /opt/seafile#将 seafile-server_* 移动到 seafile 目录下后tar -xzf seafile-server_*mkdir installedmv seafile-server_* installed
现在,你的目录看起来应该像这样:
#tree seafile -L 2haiwen├── installed│ └── seafile-server_7.0.0_x86-64.tar.gz└── seafile-server-7.0.0 ├── reset-admin.sh ├── runtime ├── seafile ├── seafile.sh ├── seahub ├── seahub.sh ├── setup-seafile-mysql.sh └── upgrade
这样设计目录的好处在于
和 seafile 相关的配置文件都可以放在
/opt/seafile/conf目录下,便于集中管理.后续升级时,你只需要解压最新的安装包到
/opt/seafile目录下.
安装 Seafile 服务器
安装前的准备工作
安装 Seafile 服务器之前,请确认已安装以下软件:
Seafile 7.0.x 版本
# on Ubuntu 16.04apt-get updateapt-get install python2.7 python-setuptools python-mysqldb python-urllib3 python-ldap -y
# on CentOS 7yum install python python-setuptools MySQL-python python-urllib3 python-ldap -y
Seafile 7.1.x 版本
# on Debian 10/Ubuntu 18.04/Ubuntu 20.04
apt-get update
apt-get install python3 python3-setuptools python3-pip python3-ldap libmysqlclient-dev -y
pip3 install --timeout=3600 Pillow pylibmc captcha jinja2 sqlalchemy==1.3.8 psd-tools \
django-pylibmc django-simple-captcha
# on CentOS 8
yum install python3 python3-setuptools python3-pip python3-ldap python3-devel gcc gcc-c++ -y
pip3 install --timeout=3600 Pillow pylibmc captcha jinja2 sqlalchemy==1.3.8 psd-tools \
django-pylibmc django-simple-captcha
Seafile 8.0.x 版本
# on Debian 10/Ubuntu 18.04/Ubuntu 20.04
apt-get update
apt-get install python3 python3-setuptools python3-pip python3-ldap libmysqlclient-dev -y
pip3 install --timeout=3600 django==2.2.* future mysqlclient pymysql Pillow pylibmc \
captcha jinja2 sqlalchemy==1.4.3 psd-tools django-pylibmc django-simple-captcha
# on CentOS 8
yum install python3 python3-setuptools python3-pip python3-ldap python3-devel mysql-devel gcc gcc-c++ -y
pip3 install --timeout=3600 django==2.2.* future mysqlclient pymysql Pillow pylibmc \
captcha jinja2 sqlalchemy==1.4.3 psd-tools django-pylibmc django-simple-captcha
这里我报了一个错
The headers or library files could not be found for jpeg,
a required dependency when compiling Pillow from source.
Please see the install instructions at:
https://pillow.readthedocs.io/en/latest/installation.html
----------------------------------------
Command "/usr/bin/python3 -u -c "import setuptools, tokenize;__file__='/tmp/pip-build-j4j835jd/Pillow/setup.py';f=getattr(tokenize, 'open', open)(__file__);code=f.read().replace('\r\n', '\n');f.close();exec(compile(code, __file__, 'exec'))" install --record /tmp/pip-4lr1hz1q-record/install-record.txt --single-version-externally-managed --compile" failed with error code 1 in /tmp/pip-build-j4j835jd/Pillow/
根据提示我们去它给的网站上可以找到解决方法
[root@localhost seafile]# python3 -m pip install --upgrade pip
WARNING: Running pip install with root privileges is generally not a good idea. Try `__main__.py install --user` instead.
Collecting pip
Downloading https://files.pythonhosted.org/packages/a4/6d/6463d49a933f547439d6b5b98b46af8742cc03ae83543e4d7688c2420f8b/pip-21.3.1-py3-none-any.whl (1.7MB)
100% |████████████████████████████████| 1.7MB 1.1MB/s
Installing collected packages: pip
Successfully installed pip-21.3.1
You are using pip version 21.3.1, however version 22.0.4 is available.
You should consider upgrading via the 'pip install --upgrade pip' command.
[root@localhost seafile]# python3 -m pip install --upgrade Pillow
Collecting Pillow
Downloading Pillow-8.4.0-cp36-cp36m-manylinux_2_17_x86_64.manylinux2014_x86_64.whl (3.1 MB)
|████████████████████████████████| 3.1 MB 1.7 MB/s
Installing collected packages: Pillow
Successfully installed Pillow-8.4.0
WARNING: Running pip as the 'root' user can result in broken permissions and conflicting behaviour with the system package manager. It is recommended to use a virtual environment instead: https://pip.pypa.io/warnings/venv
然后再继续执行安装就好了
Seafile 9.0.x 版本
# on Debian 10/Ubuntu 18.04/Ubuntu 20.04
apt-get update
apt-get install python3 python3-setuptools python3-pip python3-ldap libmysqlclient-dev -y
pip3 install --timeout=3600 django==3.2.* future mysqlclient pymysql Pillow pylibmc \
captcha jinja2 sqlalchemy==1.4.3 psd-tools django-pylibmc django-simple-captcha pycryptodome==3.12.0
注意:seafile 9.0.x 版本不支持在 Centos 系统 tar 包部署,支持 Docker 方式部署
安装
cd seafile-server-*./setup-seafile-mysql.sh #运行安装脚本并回答预设问题
如果你的系统中没有安装上面的某个软件,那么 Seafile初始化脚本会提醒你安装相应的软件包.
该脚本会依次询问你一些问题,从而一步步引导你配置 Seafile 的各项参数:
在这里, 你会被要求选择一种创建 Seafile 数据库的方式:
-------------------------------------------------------
Please choose a way to initialize seafile databases:
-------------------------------------------------------
[1] Create new ccnet/seafile/seahub databases
[2] Use existing ccnet/seafile/seahub databases
如果选择
1, 你需要提供根密码. 脚本程序会创建数据库和用户。如果选择
2, ccnet/seafile/seahub 数据库应该已经被你(或者其他人)提前创建。
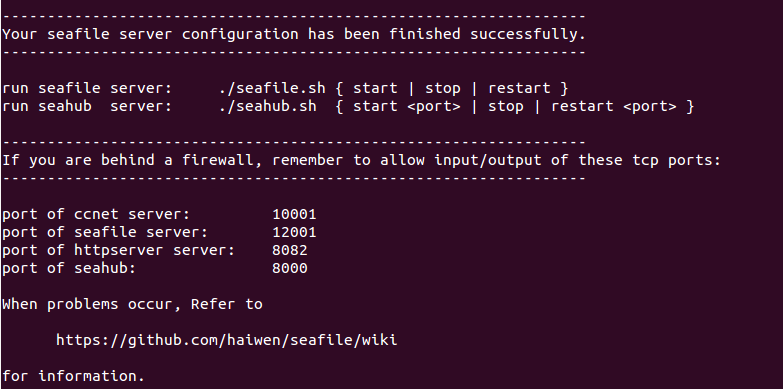
如果安装正确完成,你会看到下面这样的输出 (新版本可能会有所不同)
现在你的目录结构看起来应该是这样:
#tree seafile -L 2seafile├── ccnet # configuration files│ ├── mykey.peer│ ├── PeerMgr│ └── seafile.ini├── conf│ └── ccnet.conf│ └── seafile.conf│ └── seahub_settings.py│ └── gunicorn.conf├── installed│ └── seafile-server_7.0.0_x86-64.tar.gz├── seafile-data├── seafile-server-7.0.0 # active version│ ├── reset-admin.sh│ ├── runtime│ ├── seafile│ ├── seafile.sh│ ├── seahub│ ├── seahub.sh│ ├── setup-seafile-mysql.sh│ └── upgrade├── seafile-server-latest # symbolic link to seafile-server-7.0.0├── seahub-data│ └── avatars
seafile-server-latest文件夹为指向当前 Seafile 服务器文件夹的符号链接.
将来你升级到新版本后, 升级脚本会自动更新使其始终指向最新的 Seafile 服务器文件夹.
启动 Seafile 服务器
启动 Seafile 服务器和 Seahub 网站
在 seafile-server-latest 目录下,运行如下命令
启动 Seafile:
./seafile.sh start # 启动 Seafile 服务
启动 Seahub
./seahub.sh start # 启动 Seahub 网站 (默认运行在127.0.0.1:8000端口上)
你第一次启动 seahub 时,seahub.sh 脚本会提示你创建一个 seafile 管理员帐号。
注意:7.0.x 版本之后,8000端口默认监听在127.0.0.1地址上,这意味着您无法直接通过8000端口访问Seafile服务。建议您配置nginx反向代理。
恭喜! 现在你已经成功的安装了 Seafile 服务器.
在另一端口上运行 Seahub
如果你不想在默认的 8000 端口上运行 Seahub, 而是想自定义端口(比如8001)中运行,请按以下步骤操作:
6.3.0 及其之后的版本,我们弃用了 ./seahub.sh start <port> 的方式使seahub进程监听在其他端口。但是,您可以通过修改 conf/gunicorn.conf 中的端口设置来指定seahub启动端口。
关闭 Seafile 服务器
./seahub.sh stop # 停止 Seafile 进程 ./seafile.sh stop # 停止 Seahub
修改conf/gunicorn.conf
# default localhost:8000bind = "0.0.0.0:8001"
重启 Seafile 服务器
./seafile.sh start # 启动 Seafile 服务 ./seahub.sh start # 启动 Seahub 网站
关闭/重启 Seafile 和 Seahub
关闭
./seahub.sh stop # 停止 Seahub./seafile.sh stop # 停止 Seafile 进程
重启
./seafile.sh restart # 停止当前的 Seafile 进程,然后重启 Seafile./seahub.sh restart # 停止当前的 Seahub 进程,并在 8000 端口重新启动 Seahub
如果停止/重启的脚本运行失败
大多数情况下 seafile.sh seahub.sh 脚本可以正常工作。如果遇到问题:
使用pgrep命令检查 seafile/seahub 进程是否还在运行中
pgrep -f seafile-controller # 查看 Seafile 进程pgrep -f "seahub" # 查看 Seahub 进程
使用pkill命令杀掉相关进程
pkill -f seafile-controller # 结束 Seafile 进程pkill -f "seahub" # 结束 Seafile 进程


发表评论