先放一下软件和源码
n2n-dev.zip这是源码
n2nEdgeWindowsGui-master.zip 带GUI的
n2n_v3_windows_x64_v3.1.0-54_r1127_all_by_heiye.zip 已经编译好的
一,安装超级节点#supernode
首先到github获取n2n源码,直接去下载或者用git获取都可以,我这里就直接下载上传到云服务器了
上传之后解压(#unzip n2n-dev.zip)得到unzip n2n-dev目录,进入目录,执行一下命令
./autogen.sh #如果提示autoreconf: command not found,安装autoconf就可以解决
./configure
make# optionally install
make install
第二步提示
Can't exec "aclocal": No such file or directory at /usr/share/autoconf/Autom4te/FileUtils.pm line 326.
autoreconf: failed to run aclocal: No such file or directory
解决方法,安装automake yum -y install automake
下面是执行步骤:
[root@VM-0-3-centos n2n-dev]# ls
autogen.sh    CMakeLists.txt  config.guess  contributors.txt  doc     include  legacy   Makefile.in  packages   scripts  supernode.1  thirdparty  uncrustify.cfg  win32
CHANGELOG.md  community.list  configure.ac  COPYING           edge.8  INSTALL  LICENSE  n2n.7        README.md  src      tests        tools       VERSION         wireshark
[root@VM-0-3-centos n2n-dev]# ./autogen.sh
Wait please...
[root@VM-0-3-centos n2n-dev]# ls
autogen.sh      CMakeLists.txt  configure         COPYING  include  LICENSE      packages   src          thirdparty      VERSION
autom4te.cache  community.list  configure.ac      doc      INSTALL  Makefile.in  README.md  supernode.1  tools           win32
CHANGELOG.md    config.guess    contributors.txt  edge.8   legacy   n2n.7        scripts    tests        uncrustify.cfg  wireshark
[root@VM-0-3-centos n2n-dev]# ./configure
checking for gcc... gcc
checking whether the C compiler works... yes
checking for C compiler default output file name... a.out
checking for suffix of executables...
checking whether we are cross compiling... no
checking for suffix of object files... o
checking whether we are using the GNU C compiler... yes
checking whether gcc accepts -g... yes
checking for gcc option to accept ISO C89... none needed
configure: creating ./config.status
config.status: creating Makefile
config.status: creating tools/Makefile
config.status: creating include/config.h
[root@VM-0-3-centos n2n-dev]# make
Build for version: 3.1.0
make[1]: 离开目录“/n2nv3/n2n-dev/tools”
[root@VM-0-3-centos n2n-dev]# make install
echo "MANDIR=/usr/share/man"
MANDIR=/usr/share/man
mkdir -p /usr/sbin /usr/share/man/man1 /usr/share/man/man7 /usr/share/man/man8
install -m755 supernode /usr/sbin/
install -m755 edge /usr/sbin/
install -m644 edge.8.gz /usr/share/man/man8/
install -m644 supernode.1.gz /usr/share/man/man1/
install -m644 n2n.7.gz /usr/share/man/man7/
make -C tools install SBINDIR=/usr/sbin
make[1]: 进入目录“/n2nv3/n2n-dev/tools”
install -m755 n2n-benchmark n2n-keygen  /usr/sbin/
make[1]: 离开目录“/n2nv3/n2n-dev/tools”
[root@VM-0-3-centos n2n-dev]#
然后创建supernode.conf写入,这里是通过配置文件指定了-p(tcp端口)-t upd端口,也可以运行supernode+参数直接指定
然后运行supernode ./supernode.conf -v -f,先前台运行,看能否正常运行,后期使用可以把-v -f参数去掉
下面放运行成功的截图tcp和udp端口都已经开放了
服务端设置开启启动,首先把supernode复制到/usr/bin 目录,也可以不复制,直接使用绝对路径
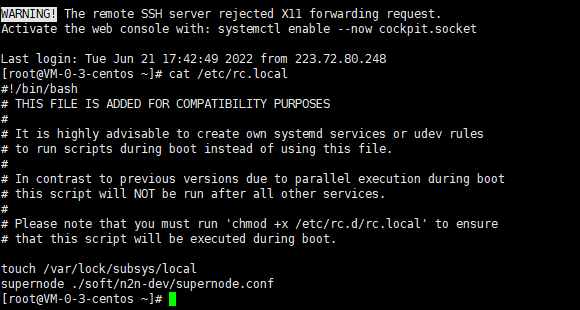
然后把刚刚启动的命令写到/etc/rc.local 里
二,客户端配置
linux客户端就不需要多说了,编译还是一样编译,执行的时候只需要执行edge(边缘节点)就可以了,也可以写入配置文件中执行的时候一起执行,edge的参数如下
-c=net1
-l=cc192.168.1.1:6666
-a=192.168.101.11
-d=TAP
-k=123456
-e=auto
-r
必要的参数 -a -l -c,其他的可填可不填
其中,-l是云服务器实例的公网 IPv4 地址和端口号,-a参数是指定自己虚拟网卡的地址,可以在有限范围内乱编,当然更推荐的是使用自动分配地址,建议先凑合着用静态分配的,-k参数是密钥,-d参数是TAP虚拟网卡适配器的名字,至于其他,照搬过来就好,至于-c参数,很明显看出是NET2了,只有同属一个相同-c的同网段用户,才能相互访问得到。
windows客户端
windows需要先安装配置 TAP 虚拟网卡
tap-windows-9.21.2.exe ,就是这个东西,安装完之后就出现了一个虚拟网卡
windows客户端同样需要编译,需要安装cmake和vs,编译过程就不多说了,编译之后得到edge和supernode的可执行文件
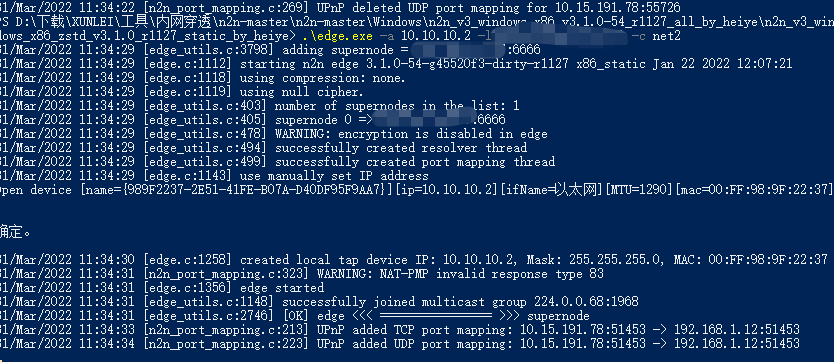
执行 .\edge.exe -a 10.10.10.2 -l 你的ip:6666 -c net2
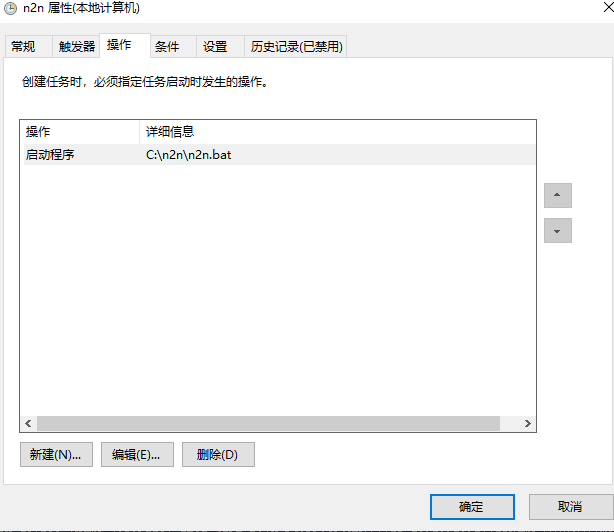
windows开机启动设置方法,把c:\n2n\edge.exe -a 10.10.10.2 -l 101.34.44.197:6666 -c net2在程序所在目录保存为bat文件,按后再任务计划程序中设置开机启动这个脚本就可以了
两个客户端网卡名不能一样


发表评论