一、主库设置
1.设置主库server-id号
[root@vhd034j ~]# vim /etc/my.cnf.d/mysql-server.cnf
#
# This group are read by MySQL server.
# Use it for options that only the server (but not clients) should see
#
# For advice on how to change settings please see
# http://dev.mysql.com/doc/refman/en/server-configuration-defaults.html
# Settings user and group are ignored when systemd is used.
# If you need to run mysqld under a different user or group,
# customize your systemd unit file for mysqld according to the
# instructions in http://fedoraproject.org/wiki/Systemd
[mysqld]
datadir=/var/lib/mysql
socket=/var/lib/mysql/mysql.sock
log-error=/var/log/mysql/mysqld.log
pid-file=/run/mysqld/mysqld.pid
table_definition_cache=400
performance_schema_max_table_instances=200
table_definition_cache=100
table_open_cache=100
innodb_buffer_pool_size=2M
server-id=1

server-id=1 #数据库唯一ID,主从的标识号绝对不能重复。
log-bin=mysql-bin #开启bin-log,并指定文件目录和文件名前缀
binlog-do-db=lw #需要同步liting数据库。如果是多个同步库,就以此格式另写几行即可。如果不指明对某个具体库同步,就去掉此行,表示同步所有库(除了ignore忽略的库)。
binlog-ignore-db=mysql,performance_schema,informantion_schema,sys #不同步mysql系统数据库。如果是多个不同步库,就以此格式另写几行;也可以在一行,中间逗号隔开。
sync_binlog = 1 #确保binlog日志写入后与硬盘同步
binlog_checksum = none #跳过现有的采用checksum的事件,mysql5.6.5以后的版本中binlog_checksum=crc32,而低版本都是binlog_checksum=none
binlog_format = mixed #bin-log日志文件格式,设置为MIXED可以防止主键重复。
auto_increment_offset=1 表示自增长字段从那个数开始,取值范围是1 .. 65535。这个就是序号。如果有n台mysql机器,则从第一台开始分为设1,2...n
auto_increment_increment=2 表示自增长字段每次递增的量,其默认值是1,取值范围是1 .. 65535。如果有n台mysql机器,这个值就设置为n。
温馨提示:在主服务器上最重要的二进制日志设置是sync_binlog,这使得mysql在每次提交事务的时候把二进制日志的内容同步到磁盘上,即使服务器崩溃也会把事件写入日志中。
sync_binlog这个参数是对于MySQL系统来说是至关重要的,他不仅影响到Binlog对MySQL所带来的性能损耗,而且还影响到MySQL中数据的完整性。对于"sync_binlog"参数的各种设置的说明如下:
sync_binlog=0,当事务提交之后,MySQL不做fsync之类的磁盘同步指令刷新binlog_cache中的信息到磁盘,而让Filesystem自行决定什么时候来做同步,或者cache满了之后才同步到磁盘。
sync_binlog=n,当每进行n次事务提交之后,MySQL将进行一次fsync之类的磁盘同步指令来将binlog_cache中的数据强制写入磁盘。
2.重启mysql数据库
systemctl restart mysqld.service

3.创建允许数据复制权限的账号
mysql> create user master@'%' identified by '1076128880';
Query OK, 0 rows affected (0.01 sec)
mysql> grant replication slave on *.* to master@'%';
Query OK, 0 rows affected (0.03 sec)

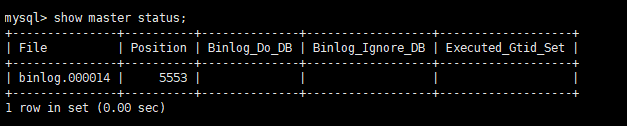
4.查看二进制文件位置
mysql> show master status;
+---------------+----------+--------------+------------------+-------------------+
| File          | Position | Binlog_Do_DB | Binlog_Ignore_DB | Executed_Gtid_Set |
+---------------+----------+--------------+------------------+-------------------+
| binlog.000014 |     5553 |              |                  |                   |
+---------------+----------+--------------+------------------+-------------------+
1 row in set (0.00 sec)
二、从库配置
1.从库一样开启二进制日志
# customize your systemd unit file for mysqld according to the
# instructions in http://fedoraproject.org/wiki/Systemd
[mysqld]
datadir=/var/lib/mysql
socket=/var/lib/mysql/mysql.sock
log-error=/var/log/mysql/mysqld.log
pid-file=/run/mysqld/mysqld.pid
server-id=2
从库配置说明
[mysqld]server-id=30 #插入数据库IDread_only=ON #设置成只读不能修改数据datadir=/var/lib/mysql #数据库目录socket=/var/lib/mysql/mysql.sock #进程位置log-error=/var/log/mysql/mysqld.log #日志位置pid-file=/run/mysqld/mysqld.pid #pid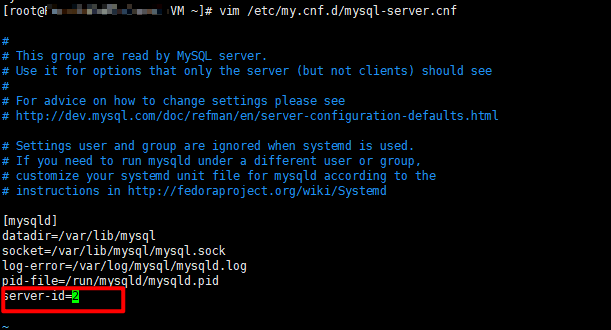
server-id=2 #数据库唯一ID,主从的标识号绝对不能重复。
log-bin=mysql-bin #开启bin-log,并指定文件目录和文件名前缀
binlog-do-db=lw #需要同步liting数据库。如果是多个同步库,就以此格式另写几行即可。如果不指明对某个具体库同步,就去掉此行,表示同步所有库(除了ignore忽略的库)。
binlog-ignore-db=mysql,performance_schema,informantion_schema,sys #不同步mysql系统数据库。如果是多个不同步库,就以此格式另写几行;也可以在一行,中间逗号隔开。
sync_binlog = 1 #确保binlog日志写入后与硬盘同步
binlog_checksum = none #跳过现有的采用checksum的事件,mysql5.6.5以后的版本中binlog_checksum=crc32,而低版本都是binlog_checksum=none
binlog_format = mixed #bin-log日志文件格式,设置为MIXED可以防止主键重复。
auto_increment_offset=2 表示自增长字段从那个数开始,取值范围是1 .. 65535。这个就是序号。如果有n台mysql机器,则从第一台开始分为设1,2...n
auto_increment_increment=2 表示自增长字段每次递增的量,其默认值是1,取值范围是1 .. 65535。如果有n台mysql机器,这个值就设置为n。
温馨提示:在主服务器上最重要的二进制日志设置是sync_binlog,这使得mysql在每次提交事务的时候把二进制日志的内容同步到磁盘上,即使服务器崩溃也会把事件写入日志中。
sync_binlog这个参数是对于MySQL系统来说是至关重要的,他不仅影响到Binlog对MySQL所带来的性能损耗,而且还影响到MySQL中数据的完整性。对于"sync_binlog"参数的各种设置的说明如下:
sync_binlog=0,当事务提交之后,MySQL不做fsync之类的磁盘同步指令刷新binlog_cache中的信息到磁盘,而让Filesystem自行决定什么时候来做同步,或者cache满了之后才同步到磁盘。
sync_binlog=n,当每进行n次事务提交之后,MySQL将进行一次fsync之类的磁盘同步指令来将binlog_cache中的数据强制写入磁盘。
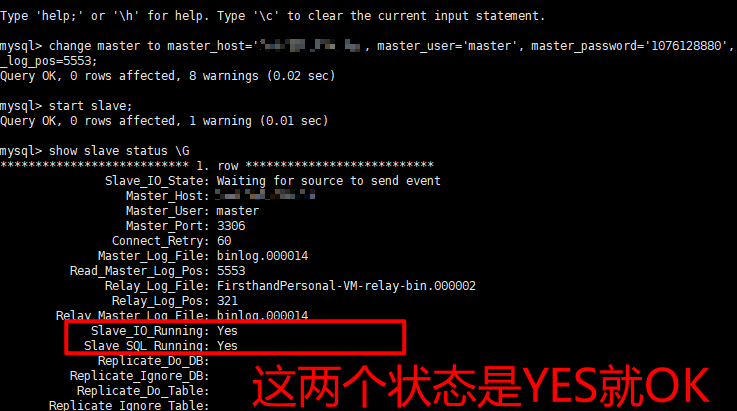
2.连接主数据库配置
change master to master_host='你的ip', master_user='master', master_password='1076128880', master_log_file='binlog.000014', master_log_pos=5553;
3.使用有复制权限的用户账号连接至主服务器,并启动复制线程
mysql> start slave;

mysql> show slave status \G
*************************** 1. row ***************************
               Slave_IO_State: Waiting for source to send event
                  Master_Host: ip
                  Master_User: master
                  Master_Port: 3306
                Connect_Retry: 60
              Master_Log_File: binlog.000014
          Read_Master_Log_Pos: 5553
               Relay_Log_File: FirsthandPersonal-VM-relay-bin.000002
                Relay_Log_Pos: 321
        Relay_Master_Log_File: binlog.000014
             Slave_IO_Running: Yes
            Slave_SQL_Running: Yes
连接数据库参数说明
#连接主数据库配置mysql> CHANGE MASTER TO -> MASTER_HOST='你的IP', #主机地址 -> MASTER_USER='master', #复制数据的账号 -> MASTER_PASSWORD='123456', #密码 -> MASTER_PORT=3306, -> MASTER_LOG_FILE='mysql-bin.000014', #二进制文件 -> MASTER_LOG_POS=5553, #二进制节点 -> MASTER_CONNECT_RETRY=10;
CHANGE MASTER TO
  MASTER_HOST='',
  MASTER_USER='master',
  MASTER_PASSWORD='',
  MASTER_PORT=3306,
  MASTER_LOG_FILE='mysql-bin.000024',
  MASTER_LOG_POS=20716919,
  MASTER_CONNECT_RETRY=10;
复制冲突的解决
#方法1MariaDB [(none)]> stop slave;MariaDB [(none)]> set global sql_slave_skip_counter=1; #表示跳过前面一条复制事件MariaDB [(none)]> start slave;#方法2[root@slave1 ~]#vim /etc/my.cnf.d/mysql-server.cnf[mysqld]slave_skip_errors=1050 #服务器选项,只读系统变量,指定跳过事件的ID[root@slave1 ~]#systemctl restart mysqlslave操作
stop slave;停止
start slave; 开始
reset slave; 重置
show slave status \G 查看主从状态