在httpd.conf添加如下配置
#下一行"*:80"在httpd.conf的配置文件中必须监听该端口
<VirtualHost *:80>
#设置主机名
ServerName www.study.com
#设置主机别名,即用该别名也可以访问(前提是域名解析正确)
ServerAlias study.com
#设置该站点根目录
DocumentRoot "E:/www/study"
#设置文件夹访问控制,其路径要和上一行的DocumentRoot一样,
<Directory "E:/www/study">
#用于显示设定“可显示文件列表”(当无可显示网页的时候)
Options Indexes
#启用文件夹访问控制的文件.htaccess设置
AllowOverride All
#请求控制
Require all granted
#默认打开的页面设置
DirectoryIndex index.php index.html
</Directory>
</VirtualHost>
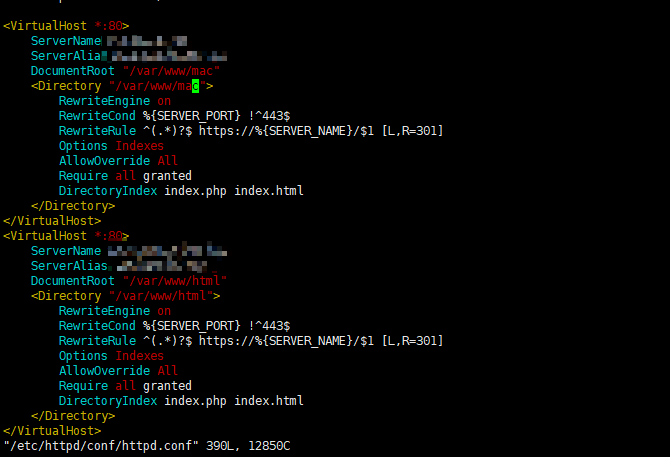
因为我的虚拟主机用了/var/www/html目录,所以还要把上面documentroot和directory的路径注释掉
我的配置如下
<VirtualHost *:80>
ServerName www.goodname.top
ServerAlias goodname.top
DocumentRoot "/var/www/wordpress"
<Directory "/var/www/wordpress">
Options Indexes
AllowOverride All
Require all granted
DirectoryIndex index.php index.html
</Directory>
</VirtualHost>
<VirtualHost *:80>
ServerName www.yulian520.top
ServerAlias yulian520.top
DocumentRoot "/var/www/html"
<Directory "/var/www/html">
Options Indexes
AllowOverride All
Require all granted
DirectoryIndex index.php index.html
</Directory>
</VirtualHost>
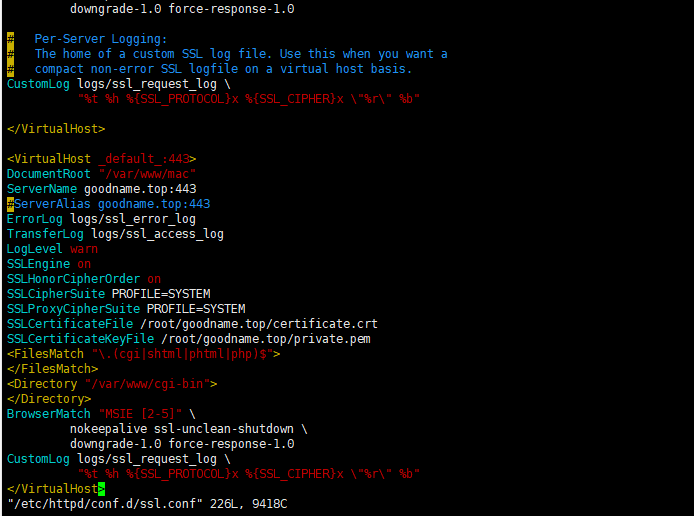
https配置
在原配置文件下加一个virtualhost
<VirtualHost _default_:443>
DocumentRoot "/var/www/mac"
ServerName goodname.top:443
#ServerAlias goodname.top:443
ErrorLog logs/ssl_error_log
TransferLog logs/ssl_access_log
LogLevel warn
SSLEngine on
SSLHonorCipherOrder on
SSLCipherSuite PROFILE=SYSTEM
SSLProxyCipherSuite PROFILE=SYSTEM
SSLCertificateFile /root/goodname.top/certificate.crt
SSLCertificateKeyFile /root/goodname.top/private.pem
<FilesMatch "\.(cgi|shtml|phtml|php)$">
</FilesMatch>
<Directory "/var/www/cgi-bin">
</Directory>
BrowserMatch "MSIE [2-5]" \
nokeepalive ssl-unclean-shutdown \
downgrade-1.0 force-response-1.0
CustomLog logs/ssl_request_log \
"%t %h %{SSL_PROTOCOL}x %{SSL_CIPHER}x \"%r\" %b"
</VirtualHost>
#···依照上面的方法,可以设置多个站点 如果配置了https,原来的httpd.conf中的配置就要注释掉,保存成默认的,然后重定向到https就可以了
注意,两个网站其中一个不能是另一个网站的子目录
如:网站1路径:/var/www/html ,网站2路径:/var/www/html/html2 就不行
网站1路径:/var/www/html ,网站2路径:/var/www/html2 就可以
Apache的核心配置文件名是”httpd.conf”,其所存放的路径在Apache目录下的conf文件夹下。修改它只需要使用记事本(建议使用其他编辑器,带行数的那种,方便修改),生效的话只需要保存httpd.conf,重启apache即可
下面一般是测试环境,毕竟加了端口,如何绑定域名,访问的时候域名后面也需加端口。
例子分别通过80和8080访问不同的根目录。
大概在50几行有个Listen 80,在下面添加8080端口。
代码如下 复制代码
Listen 80
Listen 8080<VirtualHost *:80>
ServerAdmin admin@myxzy.com
ServerName localhost:80
DocumentRoot "g:/www1"
<Directory "g:/www1">
Options Indexes FollowSymLinks
AllowOverride All
Require all granted
</Directory>
</VirtualHost>
<VirtualHost *:8080>
ServerAdmin admin@myxzy.com
ServerName localhost:8080
DocumentRoot "g:/www2"
<Directory "g:/www2">
Options Indexes FollowSymLinks
AllowOverride All
Require all granted
</Directory>
</VirtualHost>
第二种多IP同端口。
IP地址1:192.168.2.2
IP地址2:192.168.1.68
端口同是80端口。
代码如下 复制代码
<VirtualHost 192.168.1.68:80>
ServerAdmin admin@myxzy.com
ServerName localhost:80
DocumentRoot "g:/www1"
<Directory "g:/www1">
Options FollowSymLinks
AllowOverride All
Require all granted
</Directory>
</VirtualHost>
<VirtualHost 192.168.2.2:80>
ServerAdmin admin@myxzy.com
ServerName localhost:80
DocumentRoot "g:/www2"
<Directory "g:/www2">
Options FollowSymLinks
AllowOverride All
Require all granted
</Directory>
</VirtualHost>
第三种同IP不同域名和根目录(域名的话修改本地host演示)。
代码如下 复制代码
<VirtualHost 192.168.2.2:80>
ServerAdmin admin@myxzy.com
ServerName www.111cn.net
DocumentRoot "g:/www1"
<Directory "g:/www1">
Options FollowSymLinks
AllowOverride All
Require all granted
</Directory>
</VirtualHost>
<VirtualHost 192.168.2.2:80>
ServerAdmin admin@myxzy.com
ServerName www.111cn.net
DocumentRoot "g:/www2"
<Directory "g:/www2">
Options FollowSymLinks
AllowOverride All
Require all granted
</Directory>
</VirtualHost>


发表评论