一、虚拟机servera
一、配置网络地址虚拟机servera的管理口令为serverahat,请为此虚拟机配置以下网络参数:1)主机名:servera.lab.example.com2)IP地址:172.25.250.10/243)默认网关:172.25.250.2544)DNS服务器:172.25.250.254
 命令:hostnamectl set-hostname servera.lab.example.com
命令:1、nmcli connection add type ethernet ifname enp1s0 con-name enp1s0 ipv4.address 172.25.250.10 ipv4.dns 172.25.250.254 ipv4.gateway 172.25.250.254 ipv4.metmod manual autoconnect yes
2、nmcli connection up enp1s0
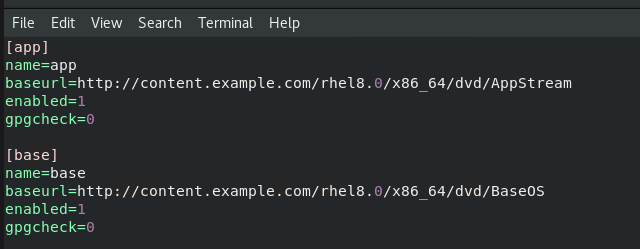
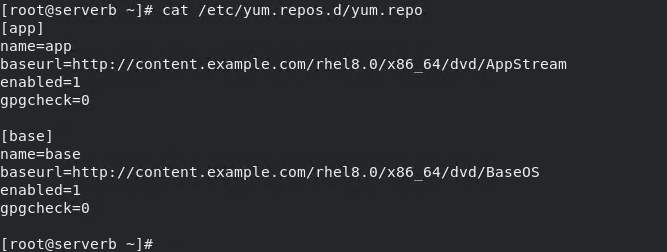
二、配置默认软件仓库请配置你虚拟机的yum仓库,地址如下:http://content.example.com/rhel8.0/x86_64/dvd/BaseOS http://content.example.com/rhel8.0/x86_64/dvd/AppStream
命令:1、vim /etc/yum.repos.d/yum.repo
[app]
name=app
baseurl=http://content.example.com/rhel8.0/x86_64/dvd/AppStream
enabled=1
gpgcheck=0
[base]
name=base
baseurl=http://content.example.com/rhel8.0/x86_64/dvd/BaseOS
enabled=1
gpgcheck=0
yum makecache
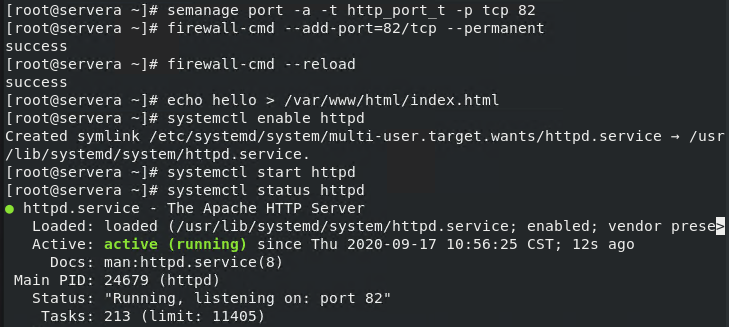
三、调试SELinux配置httpd在82端口上提供Web服务,满足以下要求:1)在/var/www/html/下添加index.html文件2)此Web服务器在系统启动时自动启动3)确保SELinux保护机制运行在Enforcing模式
命令:
1、getenforce
2、yum install httpd -y
3、vim /etc/httpd/conf/httpd.conf
修改Listen为82
4、semanage port -a -t http_port_t -p tcp 82
firewall-cmd --add-port=82/tcp --permanent
firewall-cmd --reload
echo hello > /var/www/html/index.html
systemctl start httpd
systemctl enable httpd
在浏览器中测试访问
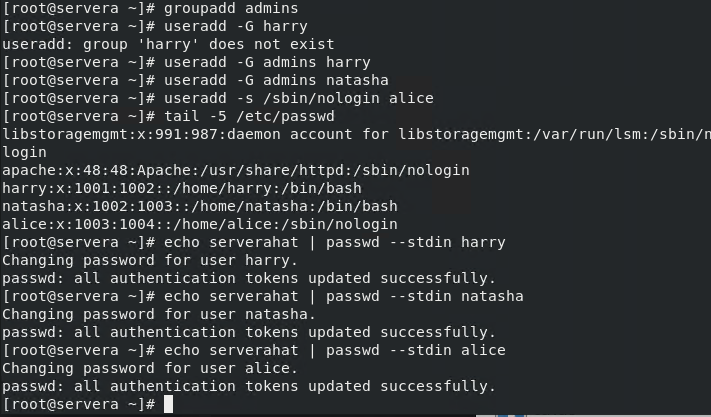
四、创建用户账户根据下列要求创建用户及组账号:1)名为admins的组2)用户harry,其附属组为admins3)用户natasha,其附属组还属于admins4)用户alice,没有可交互的登录Shell,且不属于admins组5)harry、natasha、alice的密码都应该是serverahat
命令:
groupadd admins
useradd -G admins harry
useradd -G admins natasha
useradd -s /sbin/nologin alice
echo serverahat | passwd --stdin harry
echo serverahat | passwd --stdin natasha
echo serverahat | passwd --stdin alice
五、配置cron计划任务配置计划任务,以用户harry的身份每5分钟执行一次命令echo hello。
crontab -u harry -e
*/5 * * * * /binbash echo hello
六、创建共享目录创建具有以下特点的共用目录:1)/home/tools的组的所有权是admins2)此目录能被admins组的成员读取、写入和访问,除root外其他用户没有这些权限3)在此目录下创建的文件,其组的所有权自动设置为admins组
mkdir /home/tools
chown root:admins /home/tools/
chmod g+w,g+s,o-rx /home/tools/
七、配置NTP时间客户端配置你的系统,使其成为classroom.example.com的NTP客户端。
命令:
vim /etc/chrony.conf
修改配置文件 server classroom.example.com iburst
systenctl restart chronyd.service
chronyc sources
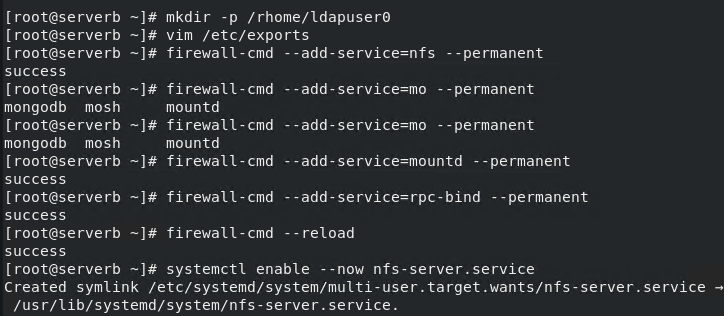
八、配置autofs在serverb主机准备NFS服务端环境,要求以读写方式共享/rhome/ldapuser0目录按照以下要求,在servera上配置autofs自动挂载:1)将servera共享的目录/rhome/ldapuser0自动挂载到本地的/rhome/ldapuser0目录2)挂载后的家目录必须可读写
serverb的配置:
vim /etc/exports
添加/rhome/ldapuser0 172.25.250.0/24(rw,no_root_squash,no_all_squash)
firewall-cmd --add-service=nfs --permanent
firewall-cmd --add-service=mountd --permanent
firewall-cmd --add-service=rpc-bind --permanent
systemctl enable --now nfs-server.service
servera配置:
命令:
yum -y install autofs.x86_64
vim /etc/auto.master
添加/rhome /etc/auto.nfs
vim /etc/auto.nfs
添加 ldapuser0 -rw 172.25.250.11:/rhome/ldapuser0
systemctl enable --now autofs.service
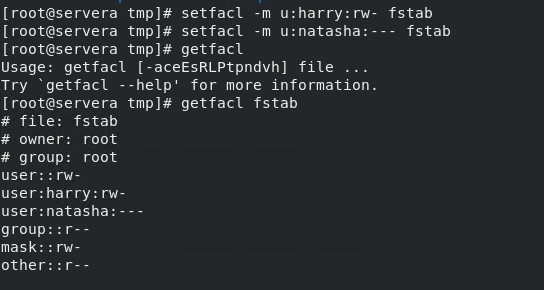
九、配置文件权限将文件/etc/fstab复制到/var/tmp/,并按要求配置/var/tmp/fstab的权限:1)文件/var/tmp/fstab属于root用户2)文件/var/tmp/fstab属于root组3)任何用户对/var/tmp/fstab都没有可执行权限4)用户harry能够读取和写入/var/tmp/fstab文件5)用户natasha无法读取或写入/var/tmp/fstab文件6)所有其他用户(包括未来创建的用户)能够读取/var/tmp/fstab文件
命令:
cp -a /etc/fstab /var/tmp/
setfacl -m u:harry:rw- /var/tmp/fstab
setfacl -m u:natasha:--- /var/tmp/fstab
十、配置用户账户创建用户tammy,其用户ID为2020,此用户的密码应当是serverahat。
命令:
useradd -u 2020 tammy
echo serverahat | passwd --stdin tammy
十一、查找文件4/ 6找出/etc/目录下大小超过5MB的文件,并将其复制到/root/findfiles目录下
命令:
mkdir -p /home/findfiles
find /etc/ -size +5M | xargs -i cp {} /home/findfiles
十二、查找字符串找出文件/etc/man_db.conf中包含字符串sbin的所有行,将其按原始顺序导入到文件/root/out.txt中,文件/root/out.txt中不得包含空行。
十三、创建归档创建一个名为/root/backup.tar.bz2的tar归档,其应该包含/usr/local/的内容。此归档文件必须使用bzip2进行压缩。
tar -jcvfP /root/backup.tar.bz2 /user/local/
虚拟机serverb十四、设置root密码将serverb的root密码设置为rhce8
十五、配置您的系统以使用默认软件仓库请配置你虚拟机的yum仓库,地址如下:http://content.example.com/rhel8.0/x86_64/dvd/BaseOS http://content.example.com/rhel8.0/x86_64/dvd/AppStream
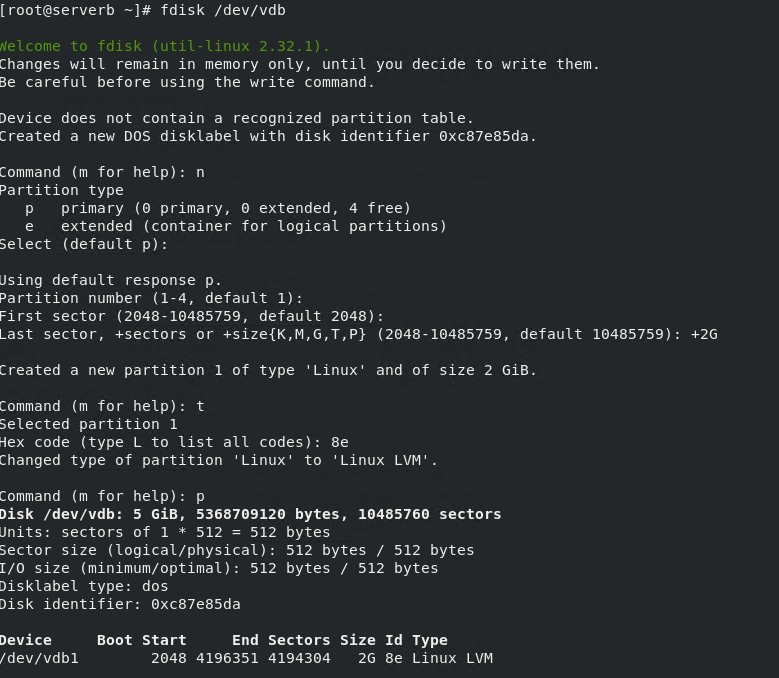
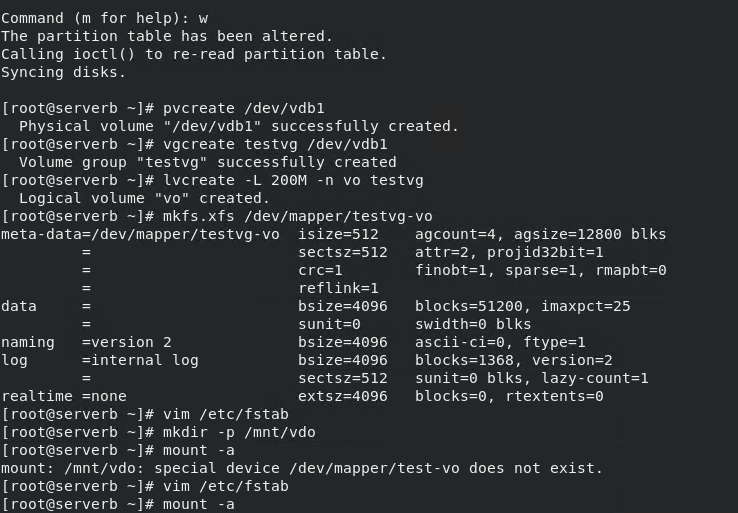
十六、调整逻辑卷大小1)预先创建2GiB的分区/dev/vdb1,并用于创建卷组testvg2)创建大小为200MiB的逻辑卷/dev/testvg/vo,格式化为xfs文件系统,并挂载在/mnt/vdo上
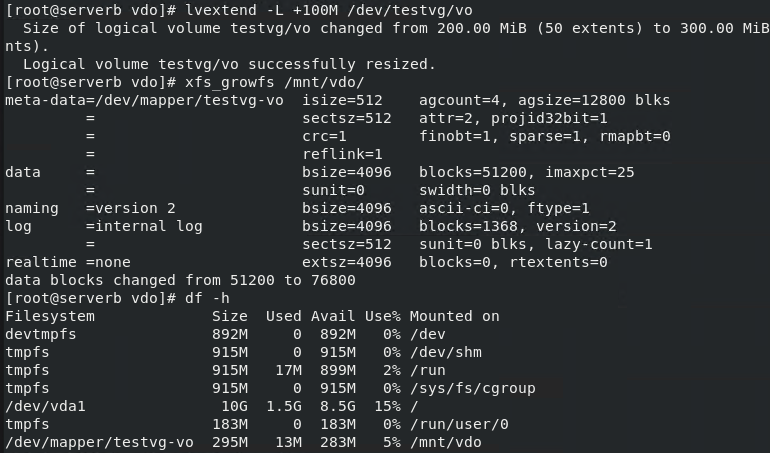
3)将逻辑卷/dev/testvg/vo及其文件系统大小调整到300MiB,确保文件系统内容保持不变。
命令:
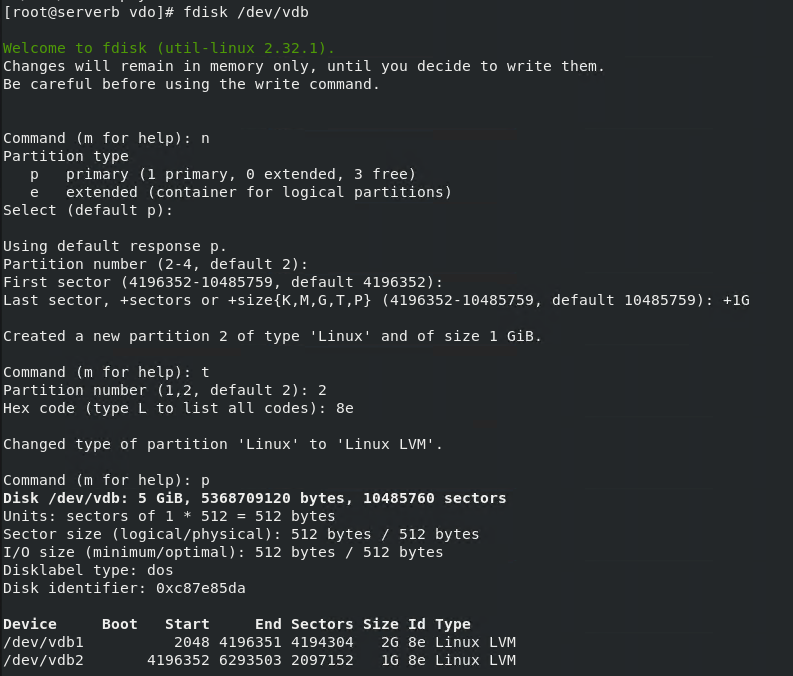
fstab /dev/vdb
n p 1 2048 +2G t 8e w
pvcreate /dev/vdb1
vgcreate testvg /dev/vdb1
lvcreate -L +200M -n vo testvg
mkfs.xfs /dev/testvg/vo
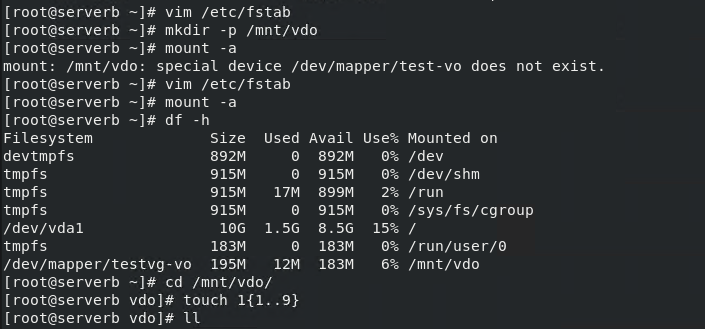
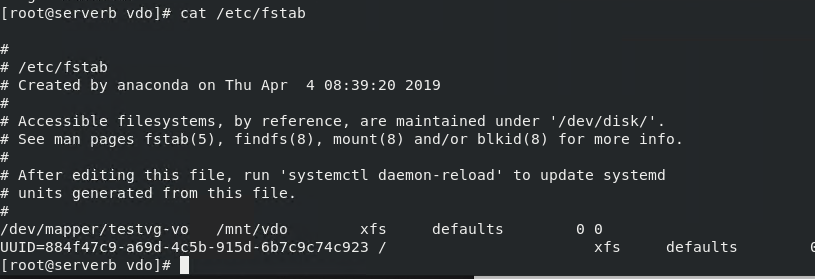
vim /etc/fstab
添加/dev/mapper/testvg-vo /mnt/vdo xfs defaults 0 0
mount -a
lvextent -L +100M /dev/mapper/testvg-vo
xfs_growfs /mnt/vdo
十七、添加交换分区在系统上添加一个512MiB的交换分区,设置交换分区应在系统启动时自动挂载,不要删除或修改系统上已存在的交换分区。
lvcreate -L 512M -n swap testvg
mkswap /dev/testvg/swap
vim /etc/fstab
添加/dev/mapper/testvg-swap swap swap defaults 0 0
swapon -a
free -h
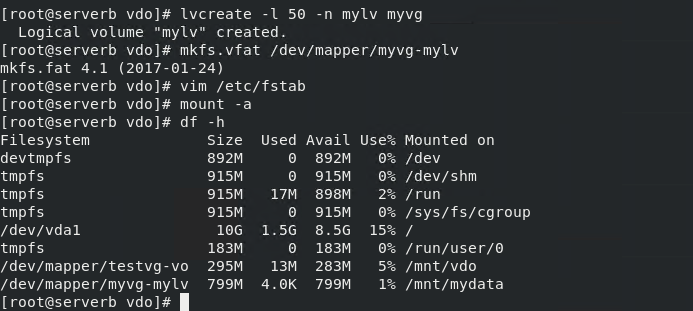
十八、创建逻辑卷根据以下要求,创建新的逻辑卷:1)逻辑卷的名字为mylv,属于myvg卷组,大小为50个pe2)卷组myvg中的逻辑卷的pe大小应当为16MiB3)使用vfat文件系统将逻辑卷mylv格式化4)此逻辑卷应当在系统启动时自动挂载到/mnt/mydata目录下
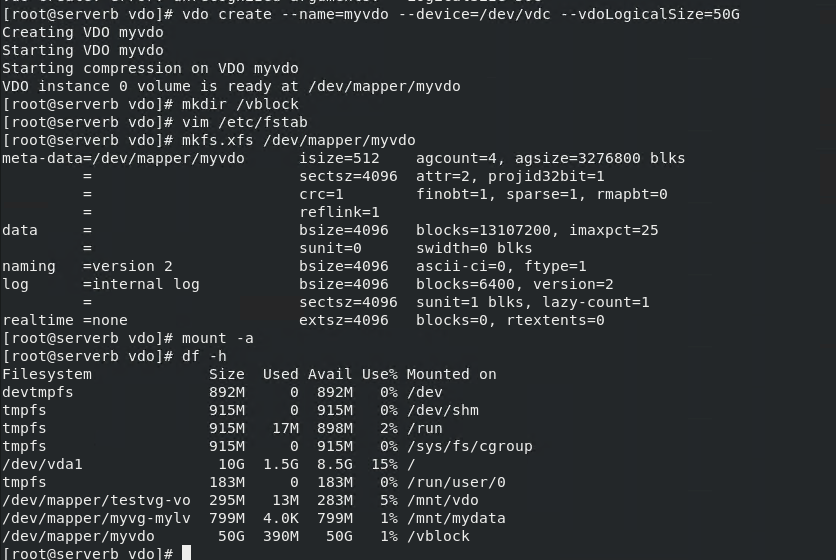
十九、创建VDO卷根据如下要求,创建新的VDO卷:1)使用未分区的磁盘(/dev/vdc)2)此VDO卷的名称为myvdo3)此VDO卷的逻辑大小为50G4)此VDO卷使用xfs文件系统格式化5)此VDO卷在系统启动时自动挂载到/vblock目录下
二十、配置系统调优6/ 6先查看tuned推荐的配置文件,并将系统的调优配置文件设置为throughput-performance
命令:tuned-adm profile throughput-performance #设置调优选项为throughput-performance
tuned-adm active















发表评论